The questions is how will you save every slide of your presentation as an image file. The answer actually is very simple and this is something I discovered today.
In MS PowerPoint 2010
File --> Save as --> Choose Save as type --> JPEG
Computer will then ask: "Every Slide" or "Current Slide only". By choosing "Every Slide" all your slides will become separate images. Fantastico!
Showing posts with label PowerPoint Magic. Show all posts
Showing posts with label PowerPoint Magic. Show all posts
Jul 11, 2012
Create passport size photos at home
If you go to a studio in India to get a Passport size photo clicked, it will easily cost you Rs. 100 for 8 photos (that's $2). I made it at home using MS PowerPoint and got 6 photos for Rs. 8 (14.55 cents). This blog post will tell you how.
 There are four steps involved.

 There are four steps involved.
- Taking your photograph
- Improving the photograph (adjust contrast/brightness)
- Setting it up in PowerPoint
- Getting the print
Step - 1 Taking the photograph
Take any digital camera and get a close-up picture of yours taken. Transfer the image onto your computer. For the purpose of this blog post we will use Sachin Tendulkar's photo.
Step - 2 Improving the photograph (Optional)
When you take a photograph with a digital camera, you might need to touch up your photo. If the original image you have taken is looking good to you then you can skip this step.
For editing follow the instructions. Open MS PowerPoint 2010. Insert the image on an empty slide. Insert -> Picture -> Select your photo from your hard disk (Short-cut: Press ALT and N together. Then press P)
Left click on the photo to select it. Go to Picture Tools Format on the top panel. Under Corrections chose the option which improves the photo.

In MS PowerPoint 2007 you can right click on the photo and choose Properties. Now you can manually increase or decrease the brightness and contrast.
Step - 3 Setting it up in PowerPoint
I paid Rs. 8 because I gave only one photograph to my local studio. It was a 4 inches x 6 inches photograph which contained 6 passport size photos. If we take these prints separately we will end up paying Rs. 48. So in this step you need to arrange 6 of your photos into one rectangle of size 4 inches x 6 inches.
Open a new slide. We need to make the slide blank. No header and body place holders. Right click on the slide and choose Layout and choose Blank.
Now go to Insert and choose a rectangle from Shapes. Draw a rectangle. Now click on the rectangle. In PowerPoint 2010, go to Drawing Tools Format. On the extreme right you have an option called Size. Enter height as 4" and width has 6".
 Now fill the rectangle with white colour and give a border. For white colour, right click on the rectangle and choose Format Shape. Under Fill choose Solid Fill and choose the colour white. Transparency will be 0%. Click okay. For black border, open Format Shape again and go to Line Color and choose Solid Line and select black (you can choose any other colour as well).
We now need to create layout of one passport photo. I chose the size 4.5 cm height x 3.5 cm width.
Insert another small rectangle and adjust its size to 1.77 inches height x 1.38 inches width. 1.77 inches = 4.5 cm. PowerPoint does not allow us to enter sizes in cm. Our slide now looks like this now.

 Now place your photo over the smaller rectangle. The photo might not fit exactly. Keep the photo slightly bigger than the smaller rectangle. Crop the photo and make it the same size as the small rectangle. To crop, select the photo. Under Picture Tools Format at the top choose Crop. Keep the cursor on the -- marks on the sides of the photo and cut the photo to the same size as the small rectangle.
You can now delete the rectangle. Cannot see your rectangle? Your rectangle is behind the photo. Right click on the photo and choose Send to back. Now click on the rectangle and delete it.
 We just need to copy and paste the photo five times and arrange the photos nicely on the 4" x 6" layout. Remember after printing, we need to cut out the photos with a scissor.
 Now select all the six photos and the rectangle in the background. You can press CTRL+A or manually drag your cursor over the bigger rectangle to select everything. Now right click (while your cursor is on the items selected) and choose Save as Picture... and save it as PNG or JPEG.
Step - 4 Getting the print
You can now take this file, give it to your local studio and ask for just one print. Take the print and using a scissor make 6 photos from it. If you have a good printer at home, you need to buy professional photo quality paper and print at home. Simple!
Now go to Insert and choose a rectangle from Shapes. Draw a rectangle. Now click on the rectangle. In PowerPoint 2010, go to Drawing Tools Format. On the extreme right you have an option called Size. Enter height as 4" and width has 6".

We now need to create layout of one passport photo. I chose the size 4.5 cm height x 3.5 cm width.
Insert another small rectangle and adjust its size to 1.77 inches height x 1.38 inches width. 1.77 inches = 4.5 cm. PowerPoint does not allow us to enter sizes in cm. Our slide now looks like this now.


You can now delete the rectangle. Cannot see your rectangle? Your rectangle is behind the photo. Right click on the photo and choose Send to back. Now click on the rectangle and delete it.


Step - 4 Getting the print
You can now take this file, give it to your local studio and ask for just one print. Take the print and using a scissor make 6 photos from it. If you have a good printer at home, you need to buy professional photo quality paper and print at home. Simple!
Nov 17, 2010
PowerPoint Puzzle #2: Make Your Chart Interactive in PowerPoint
PowerPoint charts are not interactive. They are dull and boring. Can we do something about it? May be yes. Add a touch of interactivity and dynamism into our dull charts.
How about a pie chart where % values are not visible at the start. While presenting when you click on a part of pie, the value appears and when you click again the value disappears.
Let us try to create this effect on PowerPoint.
PowerPoint Puzzle #2
 Look at this pie chart closely. The challenge is to click on the blue slice of the pie and make the January percentage data appear. Then click on the blue part again and make the value disappear. Similarly for Feb, March and April.
You don't need to know VBA or coding. I don't. Can we do it the simple and easy way?
To give your answer email to vivek [at] allaboutpresentations [dot] com OR leave a comment here.
Aug 9, 2010
How to create a Photo Album in PowerPoint?
If you are going to make a presentation with only images this trick is going to save a lot of your time. In PowerPoint 2007 you can easily make a photo album out of your images. If you have 20 images, all these 20 will get pasted automatically on 20 separate slides at the click of a button. This is how we do it:
 Creating a new album
Editing selected images
Go ahead, create a Photo Album of your family or travel photographs. Give it a nice frame. Then go to animations and choose a 'fade through black' slide transition. Apply this to all slides. To automate the album (and avoid the pain of clicking through) go to 'Advance Slide' option under Animations (it is there on the extreme right) and choose 'Automatically after 3 seconds'. Now press F5. Your photo album will start playing and change slides after every 3 seconds.
 Creating a new album
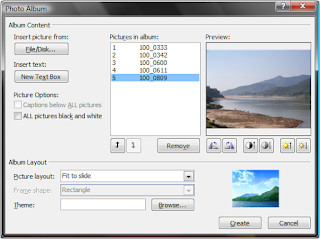
Open a new file in PowerPoint -> Insert -> Under Illustrations -> Photo Album -> New Photo Album -> Insert Picture from (choose the place where your pictures are saved). You cannot select a folder, you have to choose images. You can select more than one image at a time (press shift and select OR press control and keep choosing images)
Editing selected images
You can change the order of the images, rotate them, change brightness and contrast and make all images black & white. You can also choose to display 1 or more than 1 images per slide (Picture Layout). You can then choose a frame for every image (Frame Shape) and make the images look really cool.
Go ahead, create a Photo Album of your family or travel photographs. Give it a nice frame. Then go to animations and choose a 'fade through black' slide transition. Apply this to all slides. To automate the album (and avoid the pain of clicking through) go to 'Advance Slide' option under Animations (it is there on the extreme right) and choose 'Automatically after 3 seconds'. Now press F5. Your photo album will start playing and change slides after every 3 seconds.
Aug 4, 2010
PowerPoint Puzzle: Can you creat this shape in PowerPoint?
Today I am posing a small PowerPoint Puzzle for you. You would have used callouts in PowerPoint. We use it for depicting thoughts or to show conversation. The box in which text appears in a cartoon strip in the newspaper is an example of a callout. Here is one more example:

 The cloud above the man's head is a callout.
Now the puzzle for today is this. These callouts in PowerPoint have only one spoke. You can only make one man think or one man speak. How do you connect one callout to two people?
How do you create this shape in PowerPoint (see image below)?

Send your solution by email to vivek [at] allaboutpresentations [dot] com or by leaving a comment here. I will share the correct replies in my future posts. The solution, let me tell you, is very simple. Think.
Image credits: [Left] Andy Newson [Right] Filomena Scalise
Jan 11, 2010
Create Magic in PowerPoint
Today I am going to share a very interesting trick with you. I read about the basic technique in this post by Jan Schultink. I have added another dimension to the trick to make it more appealing. Learn the trick and then try to use it to amaze your audience at an opportune moment.
How to create this effect on PowerPoint?

This trick is actually very simple. All you need to do is to check this small presentation which explains all the 6 steps:
How to create this effect on PowerPoint?

This trick is actually very simple. All you need to do is to check this small presentation which explains all the 6 steps:
Power Point Magic Cut Outs
Now that you know the trick, go out and use it in your presentations. Make them more appealing and thrill the audiences. Best wishes for all your presentations.View more presentations from Vivek Singh.
Subscribe to:
Posts
(
Atom
)