On October 10th I made a presentation to an audience of 300. Instead of large screens I had to present on 5 LCD TVs (placed all over the hall). Because the screen size was smaller I increased the font size to 60 so people can see the slides. I wrote about it in my Oct 15th post. In response to it a reader & friend Manvendra commented on Facebook:
"Very true. Been in such an awkward situation last month. Now I carry more than one copy of the same presentation, ready for small as well as larger screen sizes."
Since I had visited the venue in advance I could manage to prepare accordingly (keep bigger font). What would we do if we went to an unknown place and found out that the screen size is much smaller? Our slides made with font size 30 are just not legible. How do we increase the font size of all the slides then and there? Or should we, as Manvendra says, carry two sets of the same presentation? Carrying two presentations might not be the best answer in my view. The solution lies in using Master Slides.
If you change the font size or color in the Master Slide, all the slides which are linked to that master slide will change.
You must use Master Slide in every presentation. Open a new file in MS PowerPoint. Go to View -> Slide Master (in 2007). Go to View -> Master -> Slide Master (in 2003)
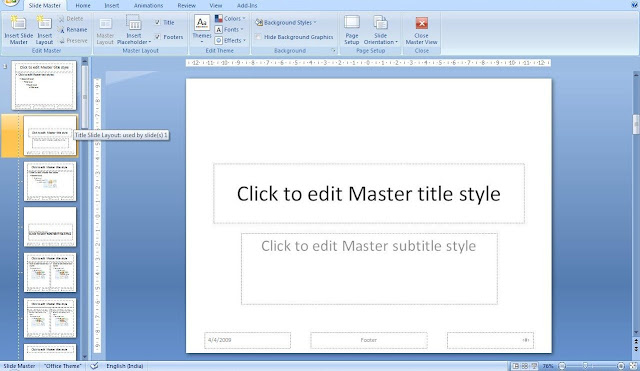
There is one theme slide (the first slide on top left) under which there are various layouts. The first layout is the title layout which is linked to make our first slide. The second layout is linked to the most popular layout for body (a header followed by a list of bullets).
All we have to do is to make a change in these layouts.
Go to the second layout under the theme slide (just below the title layout). You can click on the text box and make it bold and change the font size and color. You can also add a picture/logo here.
Now exit the Slide Master view (Close master view under Slide Master tab). Now add a new slide to the presentation. Right click on the slide on the left panel. Choose the second layout from this list. This is the layout we just made changes to. This is how we apply a layout to the main slide. That's it.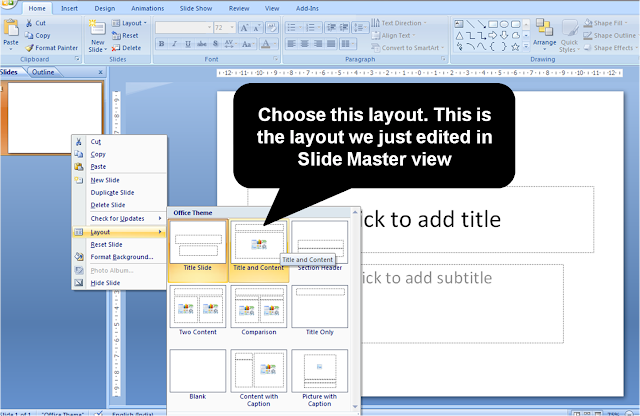
Now every slide you add, you just have to right click and apply the second layout.
The Benefit
If for some reason you want to change the font color to blue of all these slides. Just go to the layout in the Slide Master and make the color of the text blue. Automatically all the slides to which you had applied the layout, will reflect the change. It is that easy.
Coming back to where we started.
If your presentation has been made using Master Slide then to increase the font size is very easy. Just go to the master slide and choose the template and increase the font size there. Automatically all the slides where you applied this layout will reflect the change.
The Glitch
If you have inserted a text box directly onto a slide, then you cannot change the font size, type etc. through master slide. It HAS TO be changed by clicking on that particular text box on that particular slide.
Summary
It is advisable to make all PPTs using Master Slide. This way, you can save a lot of time if you have to change the font type, color or size later. You can also add a logo on Master Slide and it will reflect on all the slides automatically. You can then delete it, if you want, by just going to the Master Slide. Need not go to each slide and waste time.
---
I run my own presentation design firm. I help companies make amazing presentations. To know more write to me: vivek [@] jazz factory [dot] in
On Friday my old friend Sid called. He was going to make a presentation to a bunch of sales guys about Mutual funds and he was looking for a suitable template.
If you type 'free powerpoint templates' you will get 5.92 million results on Google and 6.09 million on Bing. But searching on Google might take some time. That's because you are looking for a specific template. In such cases, all you need to do is prioritise.
What you should do is find out 2 or 3 good websites which provide free templates. Then go and search these sites instead of wandering around on Google.
On of my favourite sites to download PowerPoint templates has been 'MS Office Online'. I used to use this site back in college days. In the last few years I have never downloaded a template.
There are two ways to visit the site. You can bookmark the URL and access from your browser. If you forget the URL you need not worry. The link is part of MS PowerPoint.
In Office 2007
Open a presentation -> Go to Design tab -> Click on down arrow to open the Themes -> Click on More Themes on Microsoft Office Online -> Click on Template categories (in the website) -> Choose PowerPoint. The process is almost similar in Office 2003.
 You can go the templates page directly by clicking here.
MS Office Online Templates
There are 9 categories under which templates have been classified. There are 62 templates under Academic and 80 under Business. Though by no means exhaustive I still feel the site has a good collection of templates.
 If you have never been on the site, you must definitely check it out. If you have your own favourite websites where you download templates from, share the link and help all of us here :)
I am a believer that you should design your own template. It makes your presentation unique and shows an extra level of effort and commitment. I wrote a post very recently on how you can do that. However, when Eric Vadeboncoeur asked me to review his website www.TemplatesWise.com I gladly accepted.
Not everyone has an interest in designing and for these presenters there are wonderful resources on the web which offer pre-designed templates.
 TemplatesWise.com is one such site. It has a very clutter free nice feel to the website and its easy to navigate as well. The website has a clear focus. It mainly offers free Powerpoint templates. The other things on offer are:
1. Music loops, and
2. Business card & website templates.
Music Loops
Music loops are tracks which are small in duration but can play continuously in your presentation in loops. These can be used for presentations and also for making videos. They are available for free on the website. You have the option of hearing them before download. The strange part however is that there are only 12 tracks available for download.
PowerPoint Templates
Templates can be browsed easily and in multiple ways like 'by category' and 'by popularity'. The available categories are:
(a) Abstract
(b) Business
(c) Finance
(d) General
(e) Nature, and
(f) Travel
In total the website has more than hundred templates. You should be able to find something worthwhile if you are looking for one here. By no means exhaustive, still it has a decent collection.There are some really good ones under 'Abstract'. I did download a few to see how they look and work. Here are some of the samples:
 The templates get downloaded as .ppt along with the images (.jpeg). Most of the templates have not been made in master slide, which I found to be slightly weird. However for the users that should not be a concern.
If you wish to download templates from the web, do check out TemplatesWise.com
Everytime you open a powerpoint you need to change fonts, designs, play around with the layout, put the corporate logo, etc. Some people actually do all this formatting every time. They do not use what are called 'templates'.
Presenters who do use templates source them in three ways:
1. Use a template available in MS PowerPoint (Design -> Themes): Most people do this. The result, every other ppt in office looks the same. Moreover, the templates are not very good.
2. Download a template from MS Office Online or hundreds of other websites: Some passionate people take the trouble and find out a good template online. There are lot of amazing templates in MS Office online. The problem, it is time taking to get a good one and these are not custom made to suit your needs.
3. Create your own template in PowerPoint: Why not add a bit of your own style to the presentations you make in the office or your club? Why not go ahead and design a template on your own? You don't need to be a designer to do this. A template made once, can be used for as long as want. It will be unique and different from all other presentations in your office.
Steps in creating your own template:
Step-1
Open a new file in PowerPoint
Go to View -> Slide Master (in Office 2007)
Go to View -> Master -> Slide Master (in Office 2003)
We will create this template in Slide Master.
Step-2
Look to the left. There will be one theme (top most slide) and several layouts inside it. The first layout is called 'Title Slide Layout' (This is going to be our template for the first slide). The second layout is called 'Title and Content Layout' (This is going to be the template for the inner slides).
Step-4
Edit 'Title Slide Layout'
You can edit it the way you want.
 Here is an example:
(a) Insert an image. Reduce image size using this technique.
(b) Select the main place holder* -> Make it bold, italics and central aligned
(c) Select the second place holder -> Bold, italics, place it below the first
*Placeholders are where we write text.
Step-5
Edit 'Title and Content Layout'
 Example:
(a) Click on a vacant area in the slide -> Ctrl+A -> Select Arial (Changes all the fonts to Arial)
(b) Insert -> Shapes -> Rectangle -> Place the shape on the top
(c) Select Shape -> Format Tab -> Shape Effects -> Shadow -> Outer -> Choose 'Offset Diagonal Bottom Right' (A header with shadow. You can also add color gradient under Shape fill-> Gradients
(d) Right click on the shape and 'Send to Back' (this sends the shape behind the header text)
(e) Select 'Header place holder' -> Change font color to white -> Readjust the shape to fit the green color background
(f) Select 'Body place holder' -> Readjust it to make it longer
(g) Choose first row -> Under 'Home Tab' Select Bullets -> Filled square bullets
(h) Insert a text box at the bottom and type 'Confidential'
Step-6
Save File As .potx (or .pot in 2003).
This is how templates are saved in PowerPoint.
Your template is ready!
Step-7
Open a new PowerPoint file.
Under 'Design Tab' -> More Themes -> Browse for Themes -> Select the .potx file from where you saved it -> Apply
 Step-8
You only see the 'Cover Slide' now.
Insert -> Ctrl+M (to insert a slide)
You can now see the readymade template for inner slides as well.
Start typing!
 Step-9
If you desire to make changes in this basic template, you can do so in the new file. You need not go to the .potx file.
In the new file, under 'View' tab -> Slide Master
You can make changes in the 'Title Slide Layout' and 'Title and Content Layout'. These changes will apply to this presentation only and not change your basic template.
Have you ever tried making a template by yourself? What were the problems you faced? Write to me and share your experience. I would love to provide all the help I can in creating a slide template which will be used by you exclusively.


