1. Compress a picture
2. Resize the picture
3. Crop the picture
4. Enhance the picture
5. Rotate the picture
Compression reduces the size of the image and makes it easy for you to email it or upload it on Picasa/Flickr or include it in the presentation. Images taken from a digi cam are mostly 2 to 3 MB. Including them as it is in a PPT increases the file size of the presentation. A compressed image will keep the file size of your PPT well within control.
Compression is of three types. I tried all the three with a 2.44 MB image and here are the results.
i. Compress for Documents (final image size became 116KB). Use this option if you want to include the image in a presentation or word document. The resolution comes down to 1024 x 685 which is perfect for a presentation. This is the recommended option.
ii. Compress for Web Pages (final size 22.2 KB). This is only suitable for websites. The image resolution becomes 448 x 336 pixels.
iii. Compress for E-mail Messages (final size 2.83 KB). Choose this option if you want to include an image in an email or add it to your signature. Here the image becomes very small in resolution (160x 160 pixels).
 In order to Compress Images open the file in Picture Manager (right click on file and choose open with Picture Manager or open Picture Manager and open the image from there). Under Pictures Tab -> Compress Pictures -> Now choose one of the above 3 options -> Ok -> Ctrl+S (save)
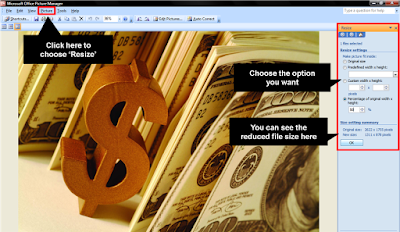
Resize the Picture works similar to Compression. In compression you have 3 fixed options but here you can choose how much file size reduction you desire. Open the file in Picture Manager -> Under Picture tab -> Resize -> You have 3 options here.
 i. Go in for a predefined six sizes. Three of these six are the same as compress images.
ii. Set custom width and height. You can choose either the width or height.
iii. Set a percentage of original width and height. If you put 50%, then the image height and width will be reduced to 50% of original size. After you have typed in say '25%' you can see the new resolution which appears in the 'Size setting summary' on your right. Click OK once you are done. By choosing 50% for the 2.44MB image the file size came to 601KB which means the reduction in size was much more than 50%.
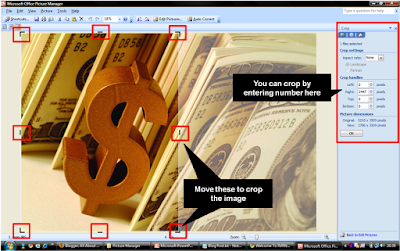
Crop the Picture feature helps you crop the image. Many a times you want to cut out unwanted parts from an image. Your image might have a date and time stamp which you want to crop out (remove) or you want to just crop the face of a person from a group photo. Crop feature helps you with that.
Let us crop the above image. Open the image in Picture Manager -> Go to Picture -> Crop. You can see black lines around the edges of the image. I have highlighted these in the eight red squares below. Click there and move them to crop (one at a time).
 You can also crop the image by putting numbers on the right side panel (shown in the image). But this is a rather longish way of doing what can be done by a mouse fast.
You can enhance a picture in a variety of ways. Under Pictures tab you can choose 'Brightness & Contrast' and 'Colour'. You can play around with these features and modify the image at hand. Under 'Colour' you will have an option called saturation. Make it equal to -100 and you will convert a colour image to black and white.

You can rotate the picture in few simple steps. Go to Rotate & Flip under Pictures tab. You can rotate the image left or right. You can even choose the degree of rotation. You can even flip the image vertically or horizontally.
Start using Microsoft Office Picture Manager and you will discover there is more to it than meets the eye. Have fun with the software.
me parece muy interesante esta pagina, muy interesante MiSTER.
ReplyDeleteGracias.
ReplyDelete