1. Different font types on different slides.
2. Different font sizes of header and body text on different slides.
3. Highlighting an important point in various ways (underscore, bold, blue colour font and red colour font) all in one slide.
4. Highlighting too many things on one slide resulting in confusing your audience as to what is really important.
5. Small font size. Just because you can see 16 size font on the computer does not mean the audience will be able to see it on the screen.
6. Animating everything thing on every slide.
7. Copy pasting naked (unformatted) tables from excel as it is on PowerPoint.
8. Body font bigger than the header font.
9. Light colour font on a white background. See you cannot read a thing :)
Stay away from these mistakes.
Aug 23, 2010
Do you justify your text in PowerPoint?
When your slides do have a lot of content, do you keep the text left aligned or you justify the text? Here is an example of what I mean to say.
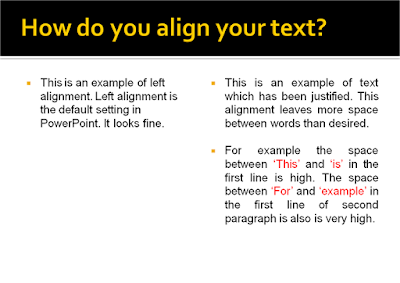 The text on your left has been left aligned (which is the default setting in PowerPoint). The text on your right has been justified. Which is your preferred option? Which one do you think looks good?
I feel the left aligned text is better. The problem with justification is that it leaves a lot of space between words. At times, this space reaches abnormal proportions and words get placed very far away from each other. It does not look natural any more.
However, there is one instance where I prefer justifying my text. This is a tip my wife gave me once and I have been following it ever since. If you have noticed, all my blog posts are left aligned. However, when I put an image on the right side, I always justify my text. Here is an example.
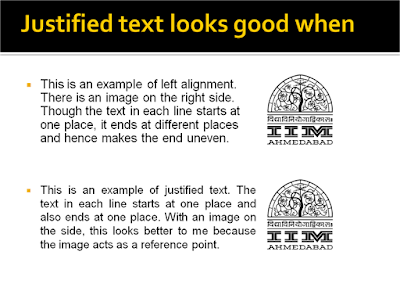 In the example above, I have used the logo of my institute to show how the text looks when seen in the context of the image. The justified text looks better.
How do you justify the text? Click inside the text box (it is called a placeholder), select all text (CTRL+A) then CTRL+J (press CTRL and J together). Press CTRL+L for left alignment.
This was about myself. I would like to hear about your choice? Do you leave the text 'left aligned' or you 'justify' your text?
Aug 21, 2010
How to make a good company profile presentation?
I am in the process of writing a post on how to make a good company profile presentation. These are presentations found on websites or shared with new clients with the objective of introducing the organisation to strangers.
I have downloaded quite a few of these from the internet to analyse how different companies make corporate profile PPTs. You can help by sharing your corporate profile presentation with me. All you have to do is to email it to vivek [at] jazz factory [dot] in. If the presentation is already on a website, just email me the link. It will help me analyse and learn from your PPT and suggest how to make it better.
I have downloaded quite a few of these from the internet to analyse how different companies make corporate profile PPTs. You can help by sharing your corporate profile presentation with me. All you have to do is to email it to vivek [at] jazz factory [dot] in. If the presentation is already on a website, just email me the link. It will help me analyse and learn from your PPT and suggest how to make it better.
Aug 19, 2010
How to convert your PowerPoint Presentations into PDF and why?
 Why convert your PowerPoint presentations into PDF?
PowerPoint Presentations are bulky and converting to PDF will drastically reduce file size. This is especially helpful if you have to email your presentations. If you wish to upload presentations on your website, it is better to upload PDFs and reduce download time. Presentations once converted into PDF cannot be altered or changed by the recipient. You can convert a presentation to a PDF and present from the PDF in full screen view.
If your presentation contains animations and slide transitions or you have embedded music or video files you should not convert the presentation to a PDF. All the effects will get lost. In almost all other cases converting to a PDF does not cause any problems.
If your presentation contains animations and slide transitions or you have embedded music or video files you should not convert the presentation to a PDF. All the effects will get lost. In almost all other cases converting to a PDF does not cause any problems.
How to convert a presentation into PDF?
1. If you have the professional version of MS Office 2007, then the converter comes free. Go to Save As and choose PDF. Give a file name and save the file.
2. If you do not have this luxury, you need not worry. There are many options available on the web. You can upload the PowerPoint file onto www.freepdfconvert.com and the PDF file will be emailed to you.
Aug 16, 2010
Introducing Prezi: A cool new way to present
What is Prezi?
 Wikipedia defines Prezi as a web-based presentation tool using a map layout and zooming to show contextual relationships which addresses some of the shortcomings of Microsoft PowerPoint.
To put this simply,
What is the philosophy behind Prezi?
Traditional presentations made on MS PowerPoint are linear. Which means content is presented one after the other (the slides are all numbered 1, 2, 3 and so on). In Prezi there are no slides. You have a large empty canvas where you can write anywhere. When you are done, you make a path and connect your text. Then you move from one bunch of content to another freely.
How to use Prezi?
The Prezi website has 3 basic, 2 advanced and 1 expert tutorial videos which teach you how to use Prezi.
Is Prezi free?
You can sign up for a free account where you can create Prezis online (presentations made using Prezi are called Prezis). You can present the Prezis online and offline. By signing up for a paid account you get more storage space online, you can make content private (prezis with a free acount can be viewed by anyone) and you get to create Prezis offline.
Should I use Prezi?
You should try Prezi once. Sign up for a free account, learn the basics and make a few presentations online. Find out how comfortable you are with Prezi. Make a small presentation in college or at work using Prezi. See how your audience reacts to it. The biggest benefit of using Prezi is that it immediately differentiates you from the crowd. Your audience would have never seen anything like this before.
The only word of caution is: Do not go overboard. Prezi has its own disadvantages. Too much of zooming in and zooming out and rotation of the screen starts making people drowsy.
What do you feel about Prezi? Share your first thoughts.
 Wikipedia defines Prezi as a web-based presentation tool using a map layout and zooming to show contextual relationships which addresses some of the shortcomings of Microsoft PowerPoint.
To put this simply,
- Prezi is a website where you can make presentations online.
- It has a map layout which means that it does not use slides. You have a large blank canvas and you can write anywhere on it.
- You can zoom in and zoom out. This helps you go deep into a sub heading and then zoom out to the bigger picture.
What is the philosophy behind Prezi?
Traditional presentations made on MS PowerPoint are linear. Which means content is presented one after the other (the slides are all numbered 1, 2, 3 and so on). In Prezi there are no slides. You have a large empty canvas where you can write anywhere. When you are done, you make a path and connect your text. Then you move from one bunch of content to another freely.
How to use Prezi?
The Prezi website has 3 basic, 2 advanced and 1 expert tutorial videos which teach you how to use Prezi.
Is Prezi free?
You can sign up for a free account where you can create Prezis online (presentations made using Prezi are called Prezis). You can present the Prezis online and offline. By signing up for a paid account you get more storage space online, you can make content private (prezis with a free acount can be viewed by anyone) and you get to create Prezis offline.
Should I use Prezi?
You should try Prezi once. Sign up for a free account, learn the basics and make a few presentations online. Find out how comfortable you are with Prezi. Make a small presentation in college or at work using Prezi. See how your audience reacts to it. The biggest benefit of using Prezi is that it immediately differentiates you from the crowd. Your audience would have never seen anything like this before.
The only word of caution is: Do not go overboard. Prezi has its own disadvantages. Too much of zooming in and zooming out and rotation of the screen starts making people drowsy.
What do you feel about Prezi? Share your first thoughts.
Aug 9, 2010
How to create a Photo Album in PowerPoint?
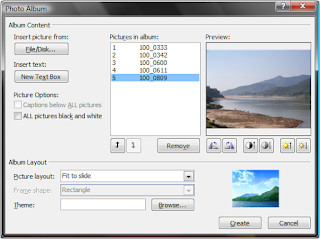
If you are going to make a presentation with only images this trick is going to save a lot of your time. In PowerPoint 2007 you can easily make a photo album out of your images. If you have 20 images, all these 20 will get pasted automatically on 20 separate slides at the click of a button. This is how we do it:
 Creating a new album
Editing selected images
Go ahead, create a Photo Album of your family or travel photographs. Give it a nice frame. Then go to animations and choose a 'fade through black' slide transition. Apply this to all slides. To automate the album (and avoid the pain of clicking through) go to 'Advance Slide' option under Animations (it is there on the extreme right) and choose 'Automatically after 3 seconds'. Now press F5. Your photo album will start playing and change slides after every 3 seconds.
 Creating a new album
Open a new file in PowerPoint -> Insert -> Under Illustrations -> Photo Album -> New Photo Album -> Insert Picture from (choose the place where your pictures are saved). You cannot select a folder, you have to choose images. You can select more than one image at a time (press shift and select OR press control and keep choosing images)
Editing selected images
You can change the order of the images, rotate them, change brightness and contrast and make all images black & white. You can also choose to display 1 or more than 1 images per slide (Picture Layout). You can then choose a frame for every image (Frame Shape) and make the images look really cool.
Go ahead, create a Photo Album of your family or travel photographs. Give it a nice frame. Then go to animations and choose a 'fade through black' slide transition. Apply this to all slides. To automate the album (and avoid the pain of clicking through) go to 'Advance Slide' option under Animations (it is there on the extreme right) and choose 'Automatically after 3 seconds'. Now press F5. Your photo album will start playing and change slides after every 3 seconds.
Aug 6, 2010
PowerPoint Puzzle #1: The Solution
In my last post I posed a PowerPoint puzzle. It turned out to be quite easy for you. The readers of this blog are smart at PowerPoint.
Derick Fernandes got it right and so did Ed, Techquestioner, Murali from Chennai & Rohit Prakash from Delhi.
The question was: How do you create this shape in PowerPoint.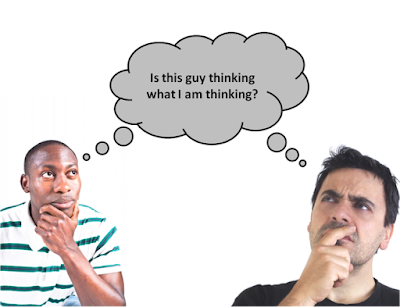
The answer: Insert one shape. Make the spoke face one person. Then copy the shape. Move the spoke of the other shape to face the other person. That's it. See the detailed solution in the slideshow below.
Derick Fernandes got it right and so did Ed, Techquestioner, Murali from Chennai & Rohit Prakash from Delhi.
The question was: How do you create this shape in PowerPoint.

The answer: Insert one shape. Make the spoke face one person. Then copy the shape. Move the spoke of the other shape to face the other person. That's it. See the detailed solution in the slideshow below.
Aug 4, 2010
PowerPoint Puzzle: Can you creat this shape in PowerPoint?
Today I am posing a small PowerPoint Puzzle for you. You would have used callouts in PowerPoint. We use it for depicting thoughts or to show conversation. The box in which text appears in a cartoon strip in the newspaper is an example of a callout. Here is one more example:

 The cloud above the man's head is a callout.
Now the puzzle for today is this. These callouts in PowerPoint have only one spoke. You can only make one man think or one man speak. How do you connect one callout to two people?
How do you create this shape in PowerPoint (see image below)?

Send your solution by email to vivek [at] allaboutpresentations [dot] com or by leaving a comment here. I will share the correct replies in my future posts. The solution, let me tell you, is very simple. Think.
Image credits: [Left] Andy Newson [Right] Filomena Scalise
Aug 2, 2010
5 things you can do with MS Office Picture Manager
MS Office comes with a very useful software 'Microsoft Office Picture Manager'. It comes with MS Office 2003 and onwards and has replaced the earlier software 'MS Photo Editor'. As the name suggests it is used for editing photographs and images. Here are some of the things we can achieve with this software:
1. Compress a picture
2. Resize the picture
3. Crop the picture
4. Enhance the picture
5. Rotate the picture
Compression reduces the size of the image and makes it easy for you to email it or upload it on Picasa/Flickr or include it in the presentation. Images taken from a digi cam are mostly 2 to 3 MB. Including them as it is in a PPT increases the file size of the presentation. A compressed image will keep the file size of your PPT well within control.
Compression is of three types. I tried all the three with a 2.44 MB image and here are the results.
i. Compress for Documents (final image size became 116KB). Use this option if you want to include the image in a presentation or word document. The resolution comes down to 1024 x 685 which is perfect for a presentation. This is the recommended option.
ii. Compress for Web Pages (final size 22.2 KB). This is only suitable for websites. The image resolution becomes 448 x 336 pixels.
iii. Compress for E-mail Messages (final size 2.83 KB). Choose this option if you want to include an image in an email or add it to your signature. Here the image becomes very small in resolution (160x 160 pixels).
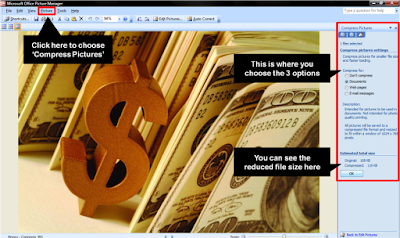 In order to Compress Images open the file in Picture Manager (right click on file and choose open with Picture Manager or open Picture Manager and open the image from there). Under Pictures Tab -> Compress Pictures -> Now choose one of the above 3 options -> Ok -> Ctrl+S (save)
Resize the Picture works similar to Compression. In compression you have 3 fixed options but here you can choose how much file size reduction you desire. Open the file in Picture Manager -> Under Picture tab -> Resize -> You have 3 options here.
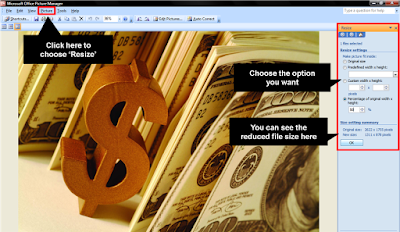 i. Go in for a predefined six sizes. Three of these six are the same as compress images.
ii. Set custom width and height. You can choose either the width or height.
iii. Set a percentage of original width and height. If you put 50%, then the image height and width will be reduced to 50% of original size. After you have typed in say '25%' you can see the new resolution which appears in the 'Size setting summary' on your right. Click OK once you are done. By choosing 50% for the 2.44MB image the file size came to 601KB which means the reduction in size was much more than 50%.
Crop the Picture feature helps you crop the image. Many a times you want to cut out unwanted parts from an image. Your image might have a date and time stamp which you want to crop out (remove) or you want to just crop the face of a person from a group photo. Crop feature helps you with that.
Let us crop the above image. Open the image in Picture Manager -> Go to Picture -> Crop. You can see black lines around the edges of the image. I have highlighted these in the eight red squares below. Click there and move them to crop (one at a time).
 You can also crop the image by putting numbers on the right side panel (shown in the image). But this is a rather longish way of doing what can be done by a mouse fast.
You can enhance a picture in a variety of ways. Under Pictures tab you can choose 'Brightness & Contrast' and 'Colour'. You can play around with these features and modify the image at hand. Under 'Colour' you will have an option called saturation. Make it equal to -100 and you will convert a colour image to black and white.

You can rotate the picture in few simple steps. Go to Rotate & Flip under Pictures tab. You can rotate the image left or right. You can even choose the degree of rotation. You can even flip the image vertically or horizontally.
Start using Microsoft Office Picture Manager and you will discover there is more to it than meets the eye. Have fun with the software.
Aug 1, 2010
Best of the Month: July '10
All About Presentations became 1 year 6 months old this July. Thank you all.
Let me wrap up the last month by sharing the three posts which were liked and read by most readers:
i. How to copy excel tables onto PowerPoint and make them look good?
ii. What is wrong with Aircel's 'Save the Tiger' initiative?
iii. 7 reasons why people sleep during corporate training sessions
One year back
In July 2009 the most read post was 'The Legend of Subodh Ranjan Saha' where I had talked about how to use mnemonics to make people remember your messages for a long long time.
From Inception
This one is for people who have started reading the blog in the last few months. You might like to read the three most popular posts on my blog from inception:
i. 10 tips on making sponsorship proposal presentations
ii. What is the ideal number of slides for a presentation?
iii. 5 tips for making successful business review presentations
Looking forward to another great month. Keep reading friends.
Subscribe to:
Comments
(
Atom
)